The Magic Behind Containers
Introduction
Have you ever wondered what actually happens when you run `docker run`? Is a container a “lightweight VM”? (Spoiler: No). To understand containers, we need to peel back the layers of abstraction and look at the Linux kernel primitives that make them possible.
This post will take you on a brief overview of containers. We’ll start with a simple idea and build layer by layer until we understand the whole stack. No magic, just Linux.
A Brief Container History
Containerization didn’t start with Docker in 2013. The idea of isolating processes on a shared OS has been decades in the making:
Early Foundations (1970s–1990s)
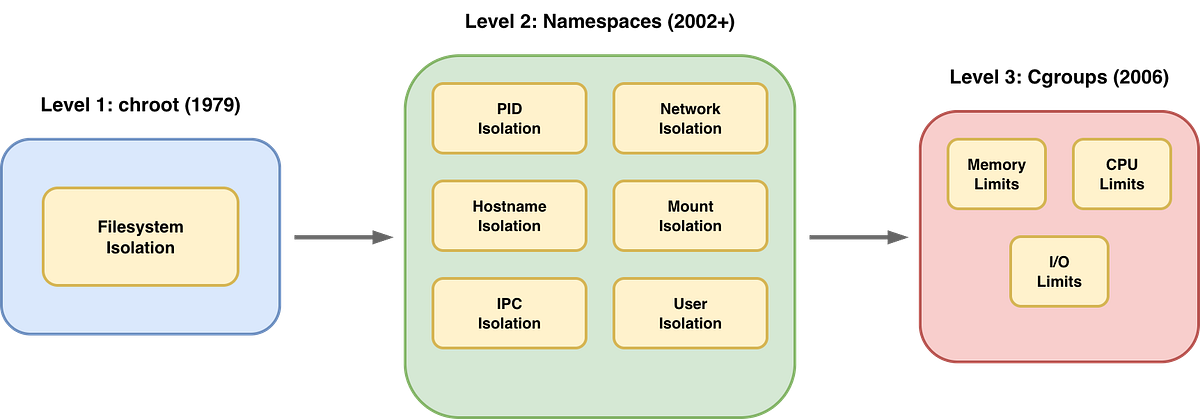
1979: chroot: The “change root” syscall was introduced in Version 7 Unix. It allowed a process to mount a specific directory as its `root` and was used for building sandbox environments, early build systems, and basic isolation. This was the first hint of filesystem isolation, often referred to as a “chroot jail.”
1982–1990s: UNIX process control and namespaces: The idea of separating processes and users started to mature, but was still quite limited.
Namespace & Control Group Innovations (2000s)
This is when the foundational features of modern containers were introduced into Linux:
2000: FreeBSD Jails: Extended the idea of chroot by also isolating users, the network, and processes. It was widely used in hosting environments.
2001 – Linux VServer (Jail-like implementation): Provided basic isolation of file systems, processes, and users.
2004: Solaris Zones: Introduced Zones (By Sun Microsystems) “Solaris Containers” as first-class OS virtualization, allowing near-complete resource isolation and virtualized environments within a single OS instance.
2006: Cgroups: Was called Process Containers, developed by Google, and merged into the Linux kernel as `cgroup`. It allowed the kernel to control what a process can use (CPU, memory, I/O).
2002-2008: Linux Namespaces: Kernel features added incrementally to isolate PID, network, mounts, hostname, and more.
2008: LXC (Linux Containers): The first complete implementation of what we think of as “modern” containers on Linux, combining Namespaces and Cgroups.
Container Ecosystem Takes Shape (2011–2012)
2011: dotCloud builds Docker: A PaaS company wanted better isolation and packaging of applications, which led them to internally build a tool using LXC to manage isolated environments efficiently.
2012: Warden (by Cloud Foundry): Similar goals to LXC, but controlled containers via an API and isolated more subsystems.
Docker Era Begins (2013)
2013: Docker: Docker 0.1 was announced, which made containers accessible to every developer with images, Dockerfiles, and registries.
2015: OCI: The Open Container Initiative established open standards to prevent vendor lock-in.
As we can see, the container journey reflects the power of open source, each layer a product of the one before it. Let’s walk through this journey together.
What IS a Container, Really?
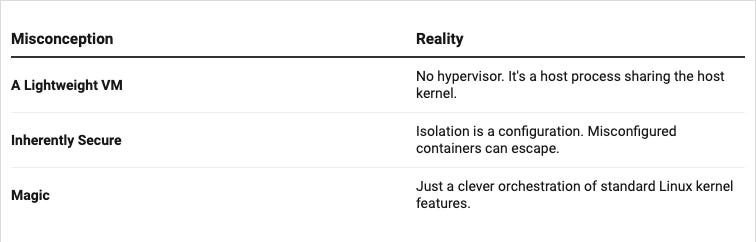
At its deep core, the container is just an isolated process on your Linux machine. It’s not a VM. It’s a regular process that is restricted by the kernel.
The Building Blocks
A container is created by combining three main kernel features:
Namespaces: They control what the process can see (isolation).
Cgroups (Control Groups): They control what the process can use (resource limits).
Capabilities: They control what the process can do (privileges).
When you combine these with a rootfs (a folder containing a minimal OS such as Alpine or Ubuntu), you get the illusion of a separate machine.
Now let’s see how we got here.
Part 1: The Isolation…Why?
Imagine you have a powerful server you want to use to run multiple applications: a web server, a database, and a queue worker. What could go wrong?
Resource Conflicts: The web server could consume all available memory, causing the database to crash.
Security: A vulnerability in one app could give an attacker access to everything.
Dependency: App A requires Python 2, App B requires Python 3. They can’t coexist.
The traditional answer back then was VMs: each app gets its own OS and its own kernel. But VMs are heavy, they take too long to boot, and consume gigabytes of RAM just for overhead.
The question became, “Can we get the isolation of a VM without the overhead?” The answer is yes, and it’s called a container. But what is a container?
Let’s go back to 1979 when we didn’t have but a single syscall `chroot` (change root).
The chroot tells the process “From now on, this directory is your `/`. You cannot see anything above it”.
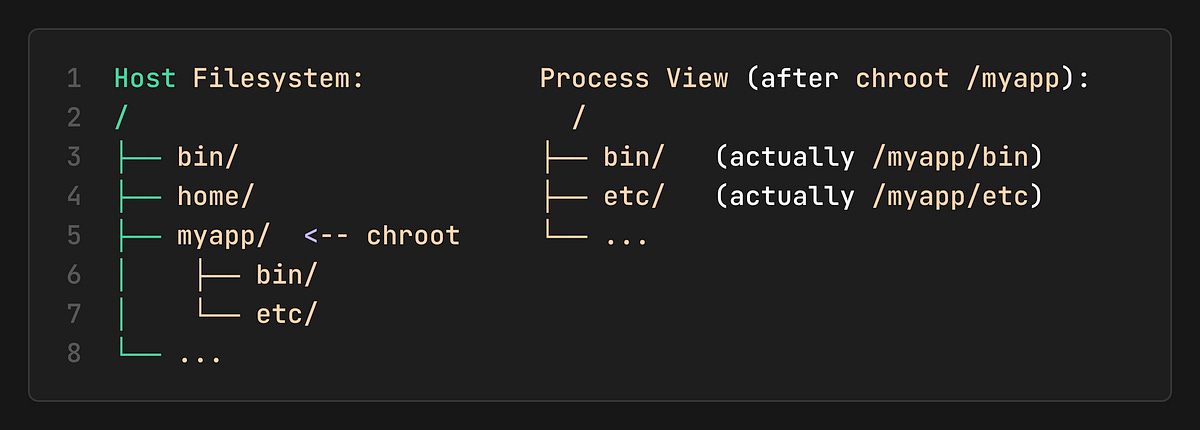
This is Filesystem Isolation (the process is in a “jail”). It can’t access `/home` or any other part of the host.
The limitation
`chroot` only isolates the filesystem, but the process still can:
See all other processes on the host (`ps aux`).
Use all the host’s memory and CPU.
Change the host’s hostname.
Access the host’s network.
We need more. Let’s add more walls to our jail.
Part 2: Linux Namespaces
Starting in 2002, the Linux kernel introduced Namespaces. Each namespace isolates a specific system resource.
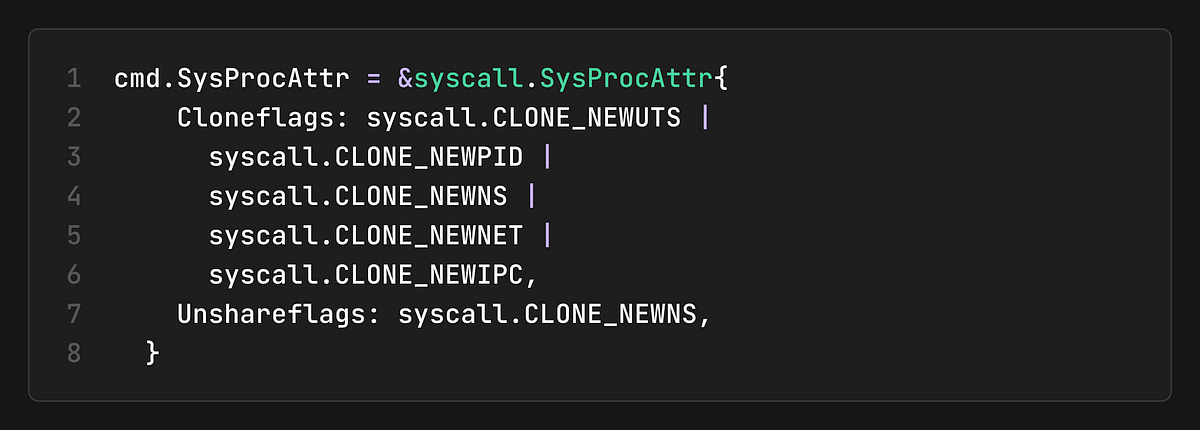
PID (`CLONE_NEWPID`): Process IDs. Container sees itself as PID 1.
Mount (`CLONE_NEWNS`): Filesystem mounts. The container has its own mount table.
UTS (`CLONE_NEWUTS`): Hostname. The container can have its own hostname.
Network (`CLONE_NEWNET`): Network stack. The container has its own interfaces/IPs.
IPC (`CLONE_NEWIPC`): Inter-Process Communication (shared memory, etc.).
User (`CLONE_NEWUSER`): User/Group IDs. root inside != root outside.
When a process is created with these flags, it lives in its own little universe. It cannot see outside its namespace.
User Namespaces
`CLONE_NEWUSER` deserves special attention. It maps UIDs/GIDs inside the container to different UIDs/GIDs on the host. This enables rootless containers:
Inside the container: You are `root` (UID 0).
On the host: You are `nobody` (UID 65534).
This means even if an attacker escapes the container, they have no privileges on the host.
Capabilities
In traditional Linux, you are either root or not. But containers use Capabilities to break down the root’s power into small pieces.
Instead of giving a container full root access, we might only give it:
`CAP_NET_BIND_SERVICE`: To bind to ports under 1024.
`CAP_CHOWN`: To change file ownership.
Even if you are root inside a container, you are a crippled root because Docker/runc drops most capabilities by default. This is defense in depth.
Let’s visualize what we have so far:
We can now isolate what a process can see. But we still haven’t limited what it can use…
Part 3: Cgroups
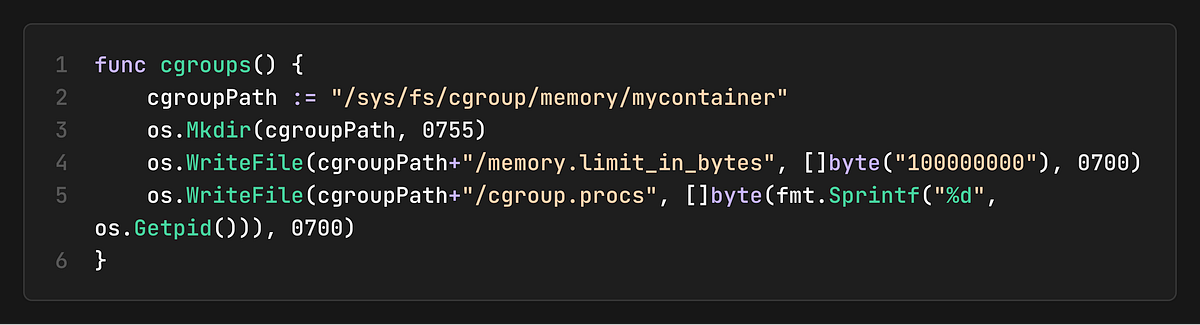
Control Groups (cgroups), developed by Google in 2006, control resource usage.
Memory → “This process can use a maximum of 512MB.”
CPU →“This process gets 50% of one CPU core.”
I/O → “This process can write 10MB/s to disk.”
Cgroups are configured by writing to special files in `/sys/fs/cgroup/`.
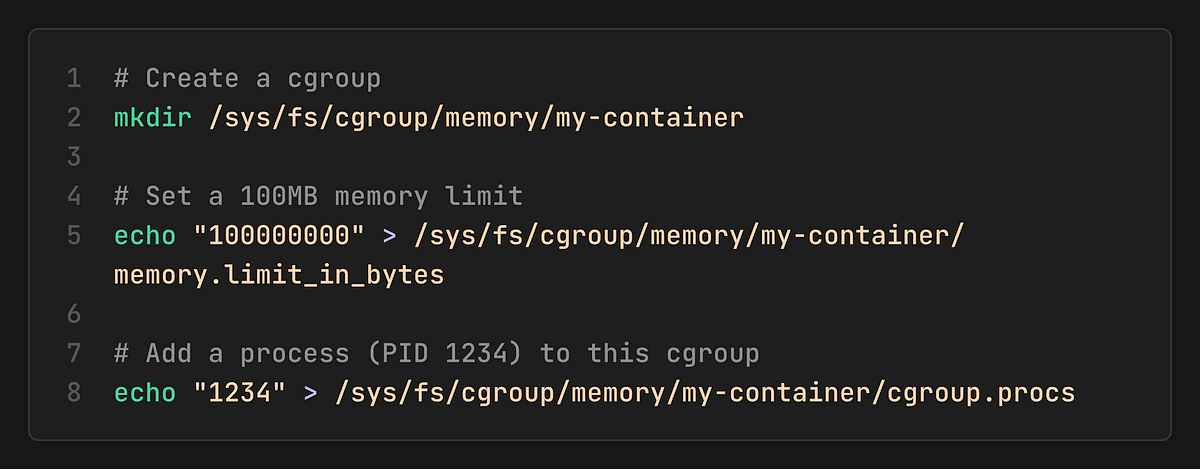
If the process tries to exceed this 100MB limit, the kernel’s OOM (Out-Of-Memory) killer will terminate it.
The Container Formula
Now we have the full picture:
Container = Namespaces (Isolation) + Cgroups (Limits) + Rootfs (Filesystem)
Namespaces: What the process can see
Cgroups: What the process can use
Rootfs: What files does the process have
This is not a VM. It’s a regular Linux process with restrictions applied by the kernel.
A Go Container Runtime
Let’s bring this to life with Golang code. This program demonstrates the exact syscalls we discussed.
1. Create Namespaces
We use the clone() syscall with namespace flags:
2. Set Up Cgroups
Inside the child process, we configure memory limits:
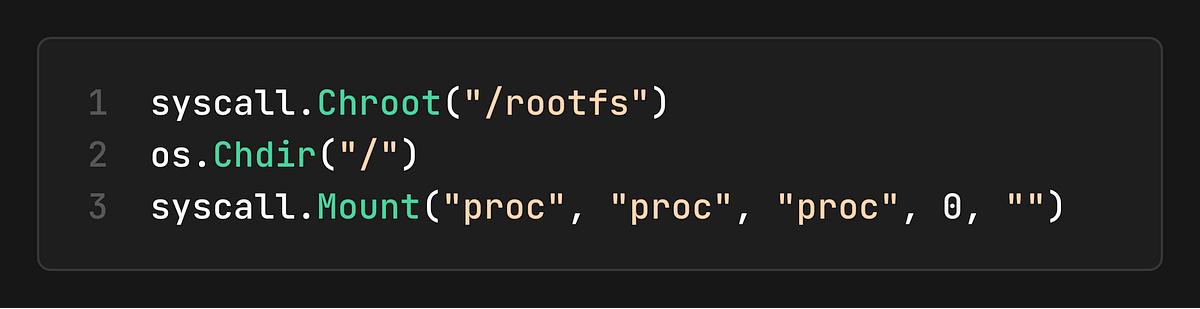
3. Jail the Filesystem
We use chroot (or `pivot_root` in production) to change the root:
4. Running It
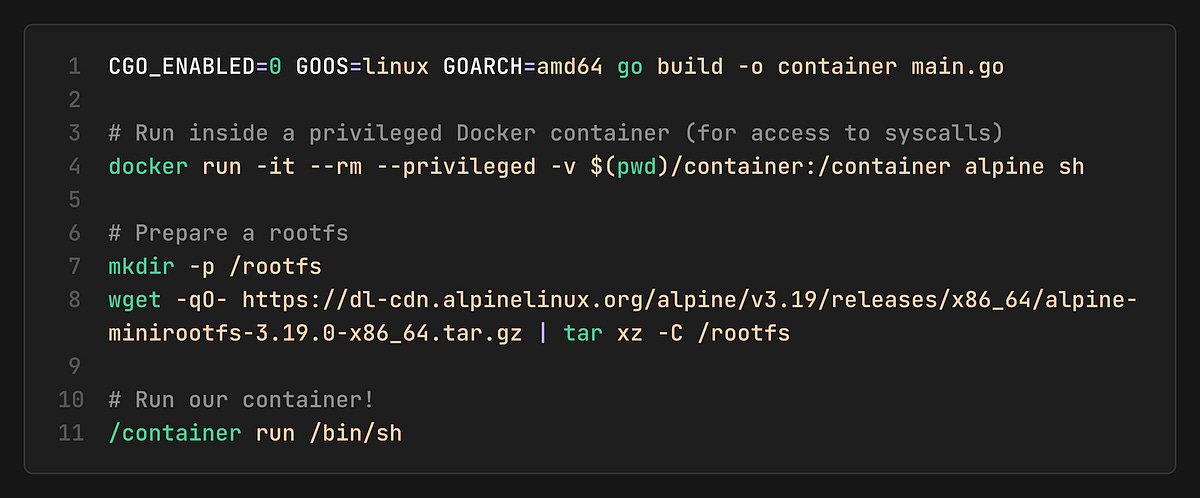
Inside, you’ll see:
`hostname` → `container` (UTS namespace works!)
`ps aux` → Only a few processes (PID namespace works!)
`echo $$` → `1` or low number (We are the init p
ocess!)
`runc` and the OCI Lifeycle
While the GoLang demo demonstrates the main steps, it does everything in a single step, runc takes a more deliberate approach by separating container creation into multiple phases. Let’s go deeper and see what’s happening behind the scenes.
The Container Lifecycle
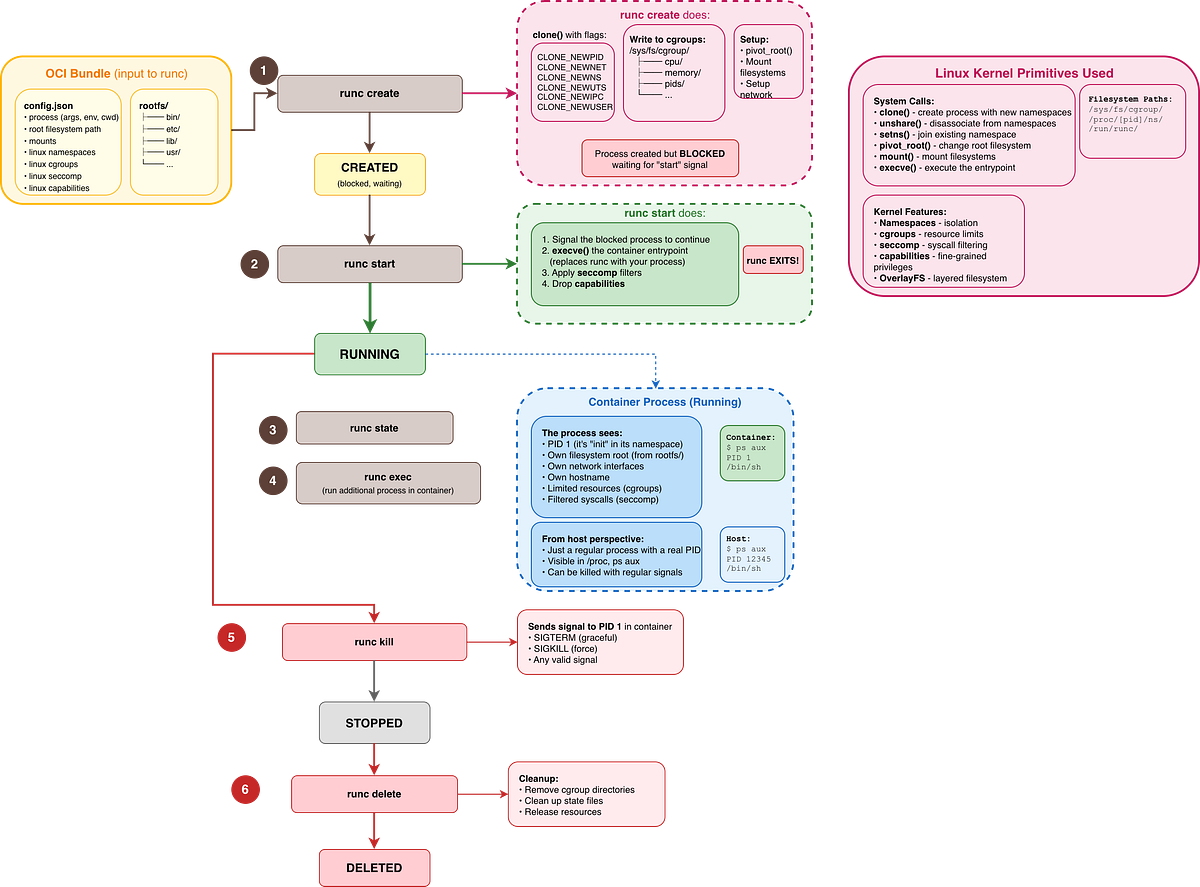
Before anything runs, you need a bundle: a directory containing your `rootfs/` and a `config.json` (the OCI Runtime Spec). This is your container’s blueprint.
When you run `runc create
`, the kernel sets up all the isolation (namespaces, cgroups, filesystem), but the container process is paused.`runc start` is when the process wakes up and begins executing your application.
The container stops either because the application exited naturally or because you sent a signal (`runc kill`). The process is gone, but the container metadata still exists.
`runc delete` cleans up all remaining resources (cgroup entries, state files). The container no longer exists.
Why the `create` → `start` split?
This two-phase approach becomes essential for orchestration:
Kubernetes uses this gap to configure networking after namespaces exist but before the app starts.
Health checks can verify that the container environment is ready before the application begins.
You can inspect a “created” container’s namespaces without the app polluting the environment.
Hands-On: Build a Container with `runc`
We’ll manually create a container using `runc, set up networking with a veth pair, and run nginx (no Docker). You can find the complete scripts for Creation and cleanup as GitHub gists.
1. Set up Linux VM
Since namespaces and cgroups are Linux features, we need a Linux environment. And since I’m on macOS, I installed Lima, which is a great way to run a lightweight Linux VM.

2. Create Rootfs (The Filesystem)
The container needs a filesystem. We’ll pull an `nginx` image, but since we aren’t using Docker to run it, we’ll just export its contents into a folder called `rootfs`. This process unpacks the container image into a regular directory structure.

3. Generate OCI Spec
Every OCI container needs a config.json. This file is the contract between the runtime and the container. It defines which isolation features to enable, what capabilities to grant, and what the process should run.

We needed to tweak it to be able to run the process longer `sleep infinity`, so the container stays alive while we configure it. Also, to make the root filesystem writable and finally to grant some Capabilities (i.e., CAP_NET_BIND_SERVICE so nginx can bind to port 80.
4. Create Container (Namespaces Ready, Process Paused)
Now we can finally ask `runc` to set up the isolation. This is the create phase. The kernel creates the namespaces, but the process inside is held before it actually runs our sleep command.

At this point, the namespaces exist, and we have a shell of a container. We can find its PID on the host:

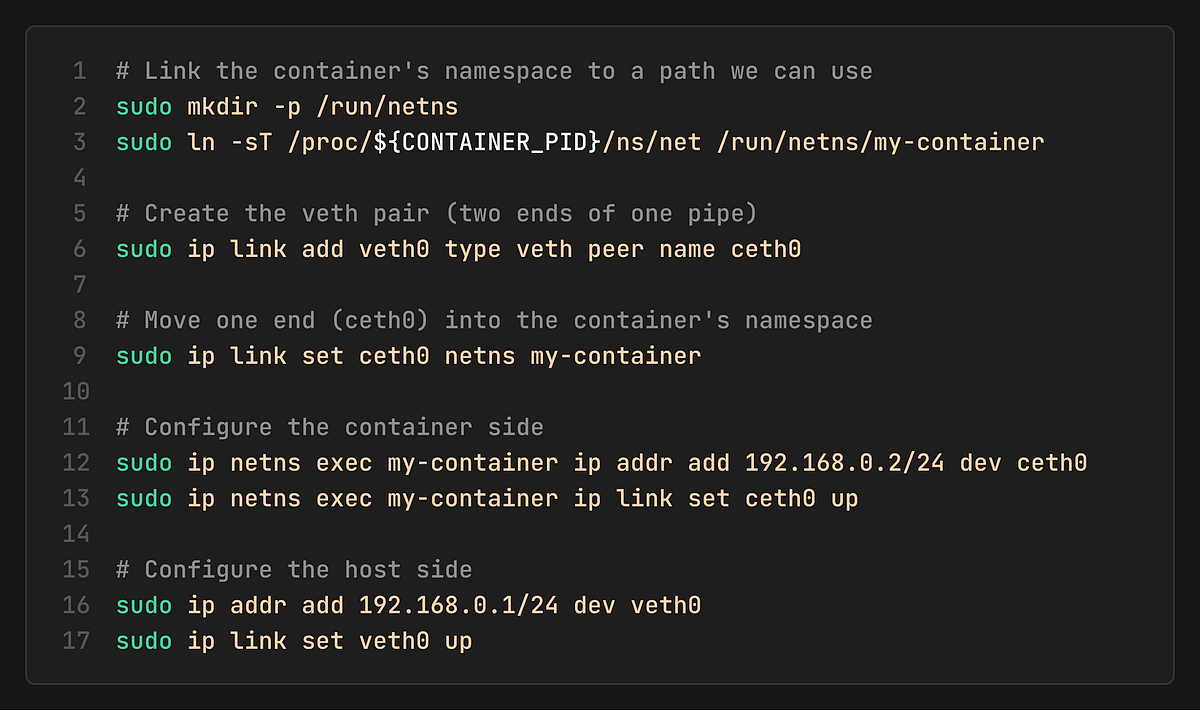
5. Connect Networking
Since the container has its own private network stack (CLONE_NEWNET), it can’t see the host’s network. We need to build a bridge.
Think of a veth pair as a virtual pipe:
One end stays in the Host namespace.
The other end is pushed into the Container namespace.
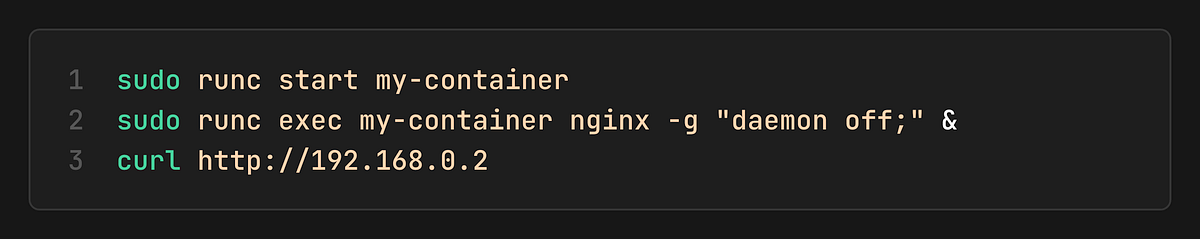
6. Start Container and Test
Now, we can start our little container by sending a wakeup signal via `runc start`.
Docker - Appreciate Abstracting the Complexity
Imagine having to repeat all the previous steps every time you want to run a container (and more for storage, security, etc.). I think you know now how much complexity Docker hides.
While Docker didn’t invent containers, it invented the developer experience.
Introduced a way to stack filesystems. If you have 10 containers running Ubuntu, you only store the Ubuntu base layer once.
Introduced Dockerfile, a simple, reproducible way to build images.
3. A central Registry (Docker Hub) to share these images.
The Modern Docker Architecture
When you type `docker run nginx`, this is the call chain:
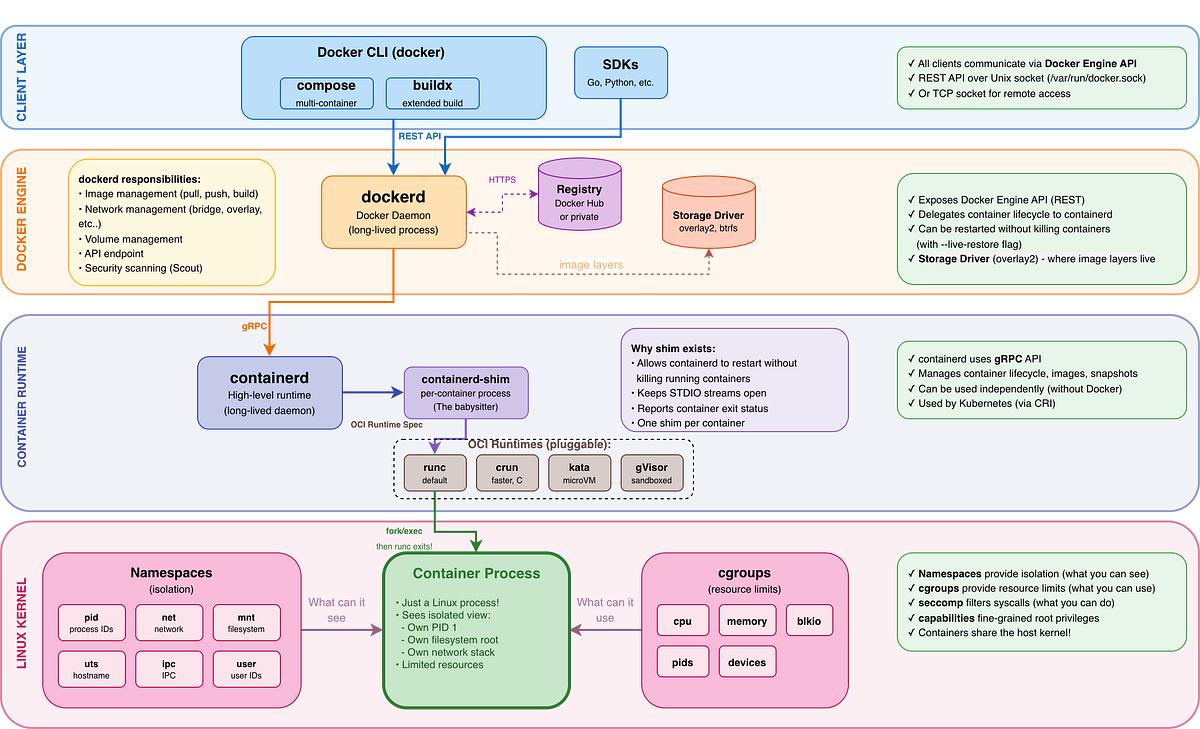
dockerd: Handles high-level logic like image building, volumes, and networking.
containerd: Manages the container lifecycle. It is the same runtime used by Kubernetes.
containerd-shim: This is the “babysitter”, one per each container, allowing `dockerd` and `containerd` to restart or upgrade without killing your running containers!
runc: The low-level OCI executor (doing the `clone()` and `cgroups` work we saw earlier). Once the container starts, `runc` actually exits!
Key insight about containerd-shim
Once `runc `starts the container process, `runc` exits. The shim takes over as the parent process, which means:
You can upgrade dockerd or containerd without killing running containers.
The shim handles stdio and exit codes for the container.
Each container has its own shim process.
The Open Container Initiative (OCI)
In 2015, Docker was the de facto standard, but other players like CoreOS were developing their own runtimes rkt. Now, the ecosystem was at risk of fragmenting.
To prevent vendor lock-in and ensure that an image built with Docker could run anywhere, the industry formed the Open Container Initiative (OCI) under the Linux Foundation with three specs:
Runtime Spec: How to run a container (implemented by `runc`).
Image Spec: How to package a container (the format of the `.tar` files and manifests).
Distribution Spec: How to push/pull containers from registries (the API protocol).
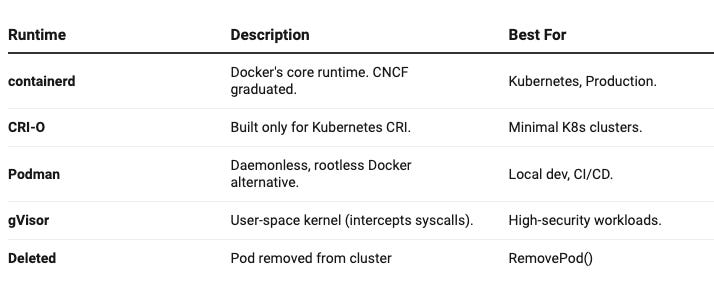
Because of OCI, an image built with Docker can run on Podman, containerd, or any compliant runtime. This also led to a rich ecosystem of container runtimes, each optimized for different use cases. Whether you need better security, Kubernetes-native integration, or a daemonless workflow, there’s a runtime built for your needs.
Conclusion
If there’s one takeaway from this journey, it’s that Docker is not containers, and containers are not Docker.
Containers are a set of Linux kernel primitives that have existed long before Docker. Docker’s brilliance was packaging these primitives into an accessible developer experience, but the technology itself belongs to no single company.
This is why open source matters. The OCI standards, `runc`, `containerd`, and the entire cloud-native ecosystem exist because the community chose openness over lock-in. Today, you can build an image with Docker, run it with Podman, deploy it on Kubernetes via containerd, and store it in any OCI-compliant registry. That portability exists only because of open standards and open source collaboration.
Understanding what containers really are makes you a better engineer. You can debug issues that others find mysterious, make informed security decisions, and appreciate the decades of work that made modern cloud-native computing possible.