Your guide to Extend Kubernetes Scheduler

This is part of a series of blog posts exploring the Kubernetes kube-scheduler. See also Deep Dive into the Kubernetes Scheduler Framework.
Introduction
In my previous post on the scheduler framework, I covered the architecture, plugin lifecycle, and core concepts. This post focuses on the practical aspects of extending the scheduler.
Your Kubernetes cluster is burning money… GPU nodes sit half-empty while your AI workloads queue up…your monthly cloud bill shows dozens of expensive GPU instances running at 30% utilization. Or maybe you’re violating GDPR by accidentally scheduling EU customer data on US nodes. Or your latency-sensitive trading application keeps getting co-located with noisy batch jobs.
The default Kubernetes scheduler doesn’t know about your costs, your compliance requirements, or your application’s latency needs. It just looks for a node with enough CPU (or GPU) and memory. But what if you could teach it about your specific needs?
The Kubernetes scheduler is designed to be extensible without requiring you to fork the codebase. Whether you want to configure built-in plugins, develop out-of-tree plugins, or run a single scheduler with multiple profiles, the scheduler framework provides elegant solutions.
This guide shows you exactly how, with real production examples from companies running Kubernetes at scale.
What You’ll Learn
By the end of this guide, you’ll know:
3 ways to extend the scheduler: from 5-minute config changes to custom Go plugins
When to use each method: decision tree included
How to build, test, and deploy: custom scheduler plugins
Real production examples: cost optimization, compliance, gang scheduling
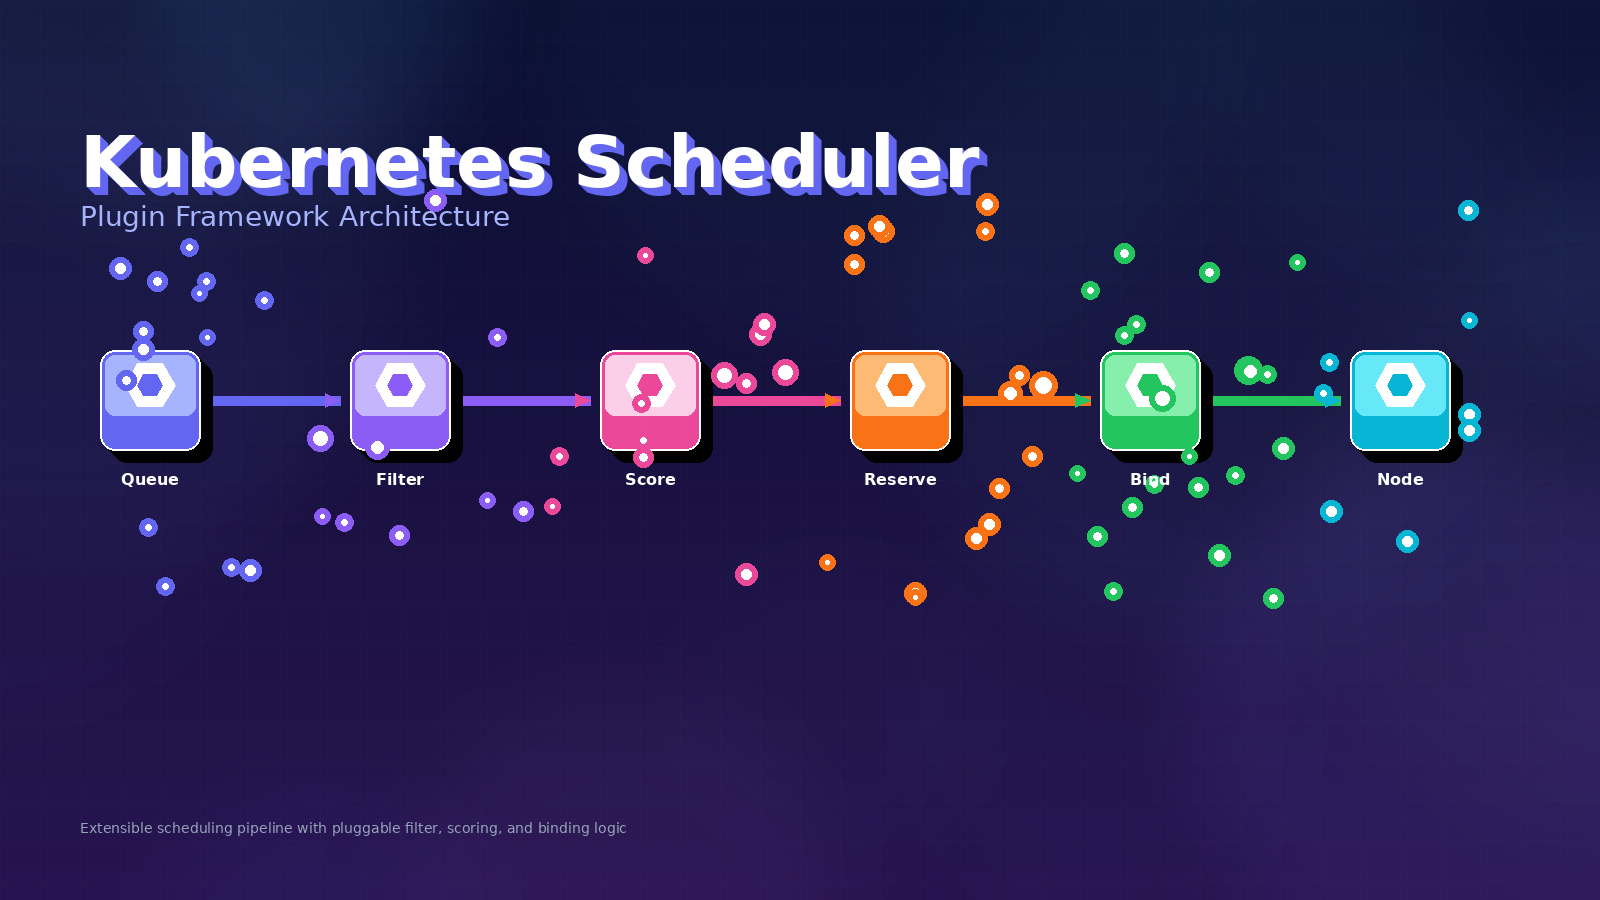
High-Level Architecture: Pod to Plugin Execution
Before diving into extension methods, let’s understand how a pod flows through the scheduler:
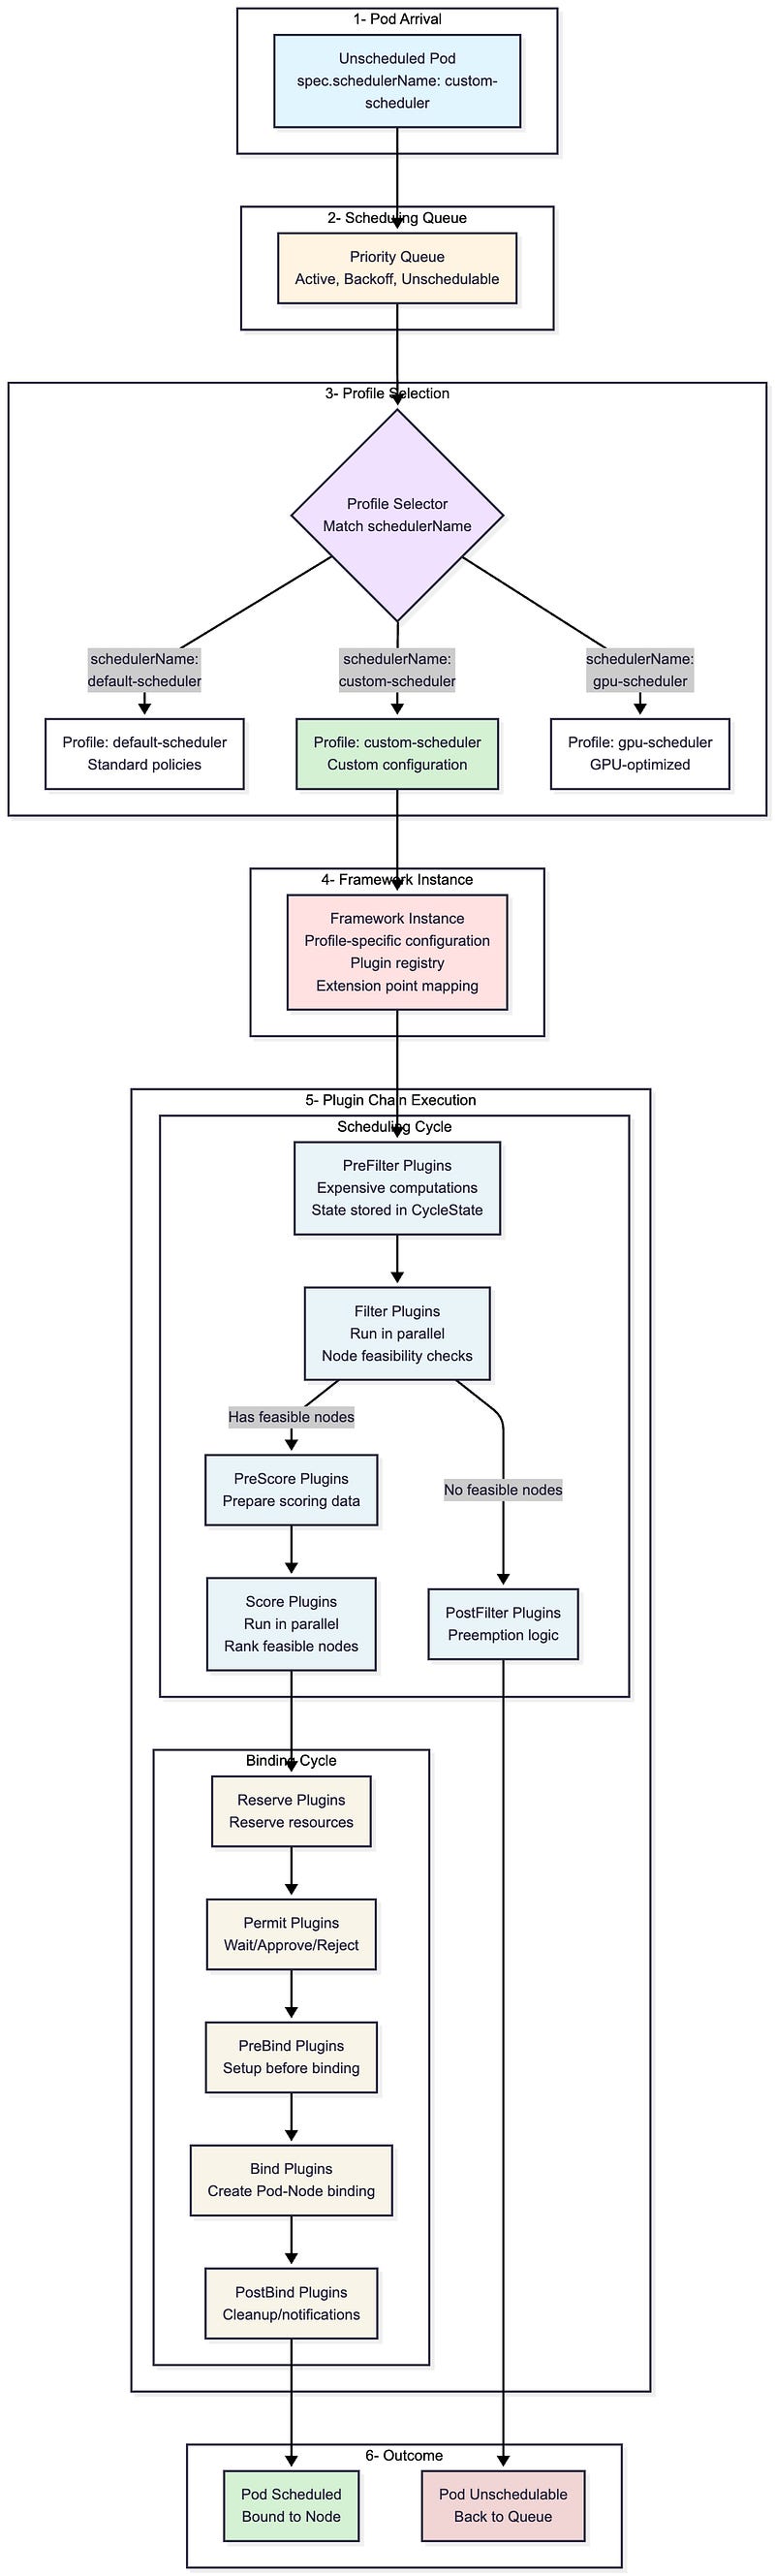
The flow shows the six stages every pod goes through during scheduling. Notice step 3 (Profile Selection) and step 5 (Plugin Chain Execution), these are your extension points. You can customize which profile a pod uses, configure the plugins within that profile, or write entirely new plugins that execute at specific points in the chain.
The three extension methods we’ll explore next give you different levels of control over these stages — from simple configuration changes to building custom plugins that run in steps 4–5.
Three Extension Methods
This post explores three powerful methods to extend the scheduler:
Configuring existing plugins: Adjust weights, enable/disable plugins, tune parameters
Creating custom out-of-tree plugins: Implement sophisticated custom scheduling logic
Using multiple scheduler profiles: Run different scheduling policies in one binary
Each method suits different use cases. Let’s explore when and how to use each one.
Method 1: Configuring Existing Plugins
The simplest way to customize scheduling behavior is by configuring existing plugins through the KubeSchedulerConfiguration API. This doesn’t require any code, just declarative YAML configuration that defines how built-in (in-tree) plugins behave.
Basic Configuration Structure
apiVersion: kubescheduler.config.k8s.io/v1
kind: KubeSchedulerConfiguration
profiles:
  - schedulerName: custom-scheduler
    plugins:
      # Enable/disable plugins at specific extension points
      filter:
        enabled:
          - name: NodeResourcesFit
          - name: NodeAffinity
        disabled:
          - name: TaintToleration
      score:
        enabled:
          - name: NodeResourcesFit
            weight: 10
          - name: PodTopologySpread
            weight: 5
    pluginConfig:
      # Configure individual plugins
      - name: NodeResourcesFit
        args:
          scoringStrategy:
            type: LeastAllocated
            resources:
              - name: cpu
                weight: 1
              - name: memory
                weight: 1
What You Can Configure
Enable/Disable Plugins
plugins:
  filter:
    disabled:
      - name: TaintToleration  # Don’t filter nodes based on taints/tolerations
2. Adjust Plugin Weights (Scoring)
plugins:
  score:
    enabled:
      - name: NodeResourcesFit
        weight: 10  # Higher weight = more influence
      - name: ImageLocality
        weight: 2
3. Configure Plugin Parameters
pluginConfig:
  - name: PodTopologySpread
    args:
      defaultConstraints:
        - maxSkew: 1
          topologyKey: topology.kubernetes.io/zone
          whenUnsatisfiable: ScheduleAnyway
4. Performance Tuning
profiles:
  - schedulerName: my-scheduler
    percentageOfNodesToScore: 50  # Score only 50% of feasible nodes (after filtering)
Common Configuration Patterns
1. Bin Packing for Efficiency
pluginConfig:
  - name: NodeResourcesFit
    args:
      scoringStrategy:
        type: MostAllocated  # Pack pods tightly
        resources:
          - name: cpu
            weight: 1
          - name: memory
            weight: 1
2. Spreading for High Availability
plugins:
  score:
    enabled:
      - name: PodTopologySpread
        weight: 10  # Maximize spread
      - name: NodeResourcesFit
        weight: 1
pluginConfig:
  - name: PodTopologySpread
    args:
      defaultConstraints:
        - maxSkew: 1
          topologyKey: kubernetes.io/hostname
          whenUnsatisfiable: ScheduleAnyway
3. GPU-Optimized Scheduling for AI/ML Workloads
Critical for AI clusters where GPUs are expensive and scarce. This configuration packs GPU workloads tightly to minimize idle GPU resources:
pluginConfig:
  - name: NodeResourcesFit
    args:
      scoringStrategy:
        type: MostAllocated  # Pack GPUs tightly to reduce fragmentation
        resources:
          - name: nvidia.com/gpu
            weight: 10  # Prioritize GPU consolidation (10x more important than CPU)
          - name: cpu
            weight: 1
          - name: memory
            weight: 1
Why does this matter? In production AI clusters, GPU utilization is often the primary cost driver. This configuration ensures that GPU nodes are filled before spinning up new ones which reduces cloud costs by keeping GPU node count minimal and prevents GPU fragmentation across many nodes.
When to Use This Method?
Use configuration when you need to:
Adjust plugin weights for your workload patterns
Disable plugins that don’t apply to your cluster
Tune performance parameters (i.e., percentageOfNodesToScore)
Change resource scoring strategies (LeastAllocated vs MostAllocated)
Configuration cannot:
Implement custom filtering logic beyond what built-in plugins provide
Create new scoring algorithms
Integrate with external systems or APIs
Access custom CRDs or external state
Start with configuration. Most scheduling customization can be achieved without writing code.
Method 2: Creating Out-of-Tree Custom Plugins
When configuration isn’t enough, you can leverage the scheduler framework to implement custom scheduling logic. You have two options:
Option A: Deploy Official Out-of-Tree Scheduler-Plugins from kubernetes-sigs (no coding required).
Option B: Build Your Own Custom Plugin by writing custom Go code for your specific requirements.
Both options use the same scheduler framework; the difference is whether you’re using existing plugins or writing new ones.
Option A: Using Official Out-of-Tree Plugins
Kubernetes community maintains production-ready plugins at kubernetes-sigs/scheduler-plugins that you can deploy without writing any code:
Capacity Scheduling: Resource quota management for multi-tenancy, ensuring different tenants receive their fair share of cluster resources
Coscheduling: Gang scheduling that ensures groups of pods are scheduled together (all-or-nothing scheduling)
Node Resources: Advanced node resource allocation strategies beyond the default scheduler
Node Resource Topology: NUMA-aware scheduling that considers node topology for performance-sensitive workloads
Preemption Toleration: Fine-grained control over pod preemption behavior
Trimaran: Load-aware scheduling based on real-time node metrics and actual resource usage
Network-Aware Scheduling: Considers network topology and bandwidth for network-intensive applications
The scheduler-plugins repository provides pre-built images with all official plugins included (see compatibility matrix). You can choose to install it as a single scheduler (replacement for the default kube-scheduler) or as a second scheduler.
Option B: Building Your Own Custom Plugin
When you need custom logic that doesn’t exist in official plugins, you can build your own. Here’s what you need to do:
Implement the Plugin Interface
package myplugin

import (
    “context”
    “fmt”

    v1 “k8s.io/api/core/v1”
    “k8s.io/apimachinery/pkg/runtime”
    fwk “k8s.io/kube-scheduler/framework”
)

// MyPlugin implements custom scheduling logic
type MyPlugin struct {
    handle fwk.Handle
}

// Name returns the plugin name
func (pl *MyPlugin) Name() string {
    return “MyPlugin”
}

// Implement FilterPlugin interface
func (pl *MyPlugin) Filter(ctx context.Context, state fwk.CycleState, pod *v1.Pod, nodeInfo fwk.NodeInfo) *fwk.Status {
    // Custom filtering logic
    node := nodeInfo.Node()

    // Example: Only schedule on nodes with a specific label
    if node.Labels[”custom-workload”] != “true” {
        return fwk.NewStatus(fwk.Unschedulable, “node doesn’t have custom-workload label”)
    }

    return nil
}

// Implement ScorePlugin interface
func (pl *MyPlugin) Score(ctx context.Context, state fwk.CycleState, pod *v1.Pod, nodeInfo fwk.NodeInfo) (int64, *fwk.Status) {
    // Custom scoring logic
    // Return score between 0-100
    return 50, nil
}

// ScoreExtensions returns nil as we don’t need normalization
func (pl *MyPlugin) ScoreExtensions() fwk.ScoreExtensions {
    return nil
}

// New creates a new plugin instance
func New(_ context.Context, obj runtime.Object, h fwk.Handle) (fwk.Plugin, error) {
    return &MyPlugin{handle: h}, nil
}
2. Register the Plugin to the scheduler regisrty
package main

import (
    “context”
    “os”

    “k8s.io/component-base/cli”
    “k8s.io/kubernetes/cmd/kube-scheduler/app”
    fwkruntime “k8s.io/kubernetes/pkg/scheduler/framework/runtime”

    “yourmodule/myplugin”
)

func main() {
    // Create out-of-tree registry
    registry := fwkruntime.Registry{
        “MyPlugin”: myplugin.New,
    }

    // Register the plugin
    command := app.NewSchedulerCommand(
        app.WithPlugin(”MyPlugin”, myplugin.New),
    )

    code := cli.Run(command)
    os.Exit(code)
}
3. Configure the Custom Plugin
Create a scheduler configuration that enables your custom plugin:
apiVersion: kubescheduler.config.k8s.io/v1
kind: KubeSchedulerConfiguration
profiles:
  - schedulerName: my-custom-scheduler
    plugins:
      filter:
        enabled:
          - name: MyPlugin
      score:
        enabled:
          - name: MyPlugin
            weight: 10
4. Deploy Your Custom Out-of-Tree Plugins
Once you’ve built your custom plugin (like MyPlugin above), you need to deploy it. The standard `registry.k8s.io/kube-scheduler` image does not include your custom plugin, so you must build your own image.
Create RBAC Resources: to allow your custom scheduler the appropriate permissions. This includes ServiceAccount, ClusterRole, and ClusterRoleBinding
Build a docker image
Create a deployment for the new image
apiVersion: apps/v1
kind: Deployment
metadata:
  name: my-scheduler
  namespace: kube-system
spec:
  replicas: 1
  selector:
    matchLabels:
      component: scheduler
      tier: control-plane
  template:
    metadata:
      labels:
        component: scheduler
        tier: control-plane
    spec:
      serviceAccountName: my-scheduler
      containers:
      - name: scheduler
        image: myregistry.io/my-scheduler:v1.0.0
        command:
        - /usr/local/bin/kube-scheduler
        - --config=/etc/kubernetes/scheduler-config.yaml
        - --v=3
        volumeMounts:
        - name: config
          mountPath: /etc/kubernetes
          readOnly: true
      volumes:
      - name: config
        configMap:
          name: my-scheduler-config
---
apiVersion: v1
kind: ConfigMap
metadata:
  name: my-scheduler-config
  namespace: kube-system
data:
  scheduler-config.yaml: |
    apiVersion: kubescheduler.config.k8s.io/v1
    kind: KubeSchedulerConfiguration
    leaderElection:
      leaderElect: true
      resourceName: my-scheduler
      resourceNamespace: kube-system
    profiles:
    - schedulerName: my-custom-scheduler
      plugins:
        filter:
          enabled:
          - name: MyPlugin
        score:
          enabled:
          - name: MyPlugin
            weight: 10
Use your new scheduler
Custom Plugin Development Best Practices
1. Use CycleState for Data Sharing: your PreFilter/PreScore does expensive computations, store results in CycleState for Filter/Score plugins to use:
type myState struct {
    computedData map[string]interface{}
}

func (s *myState) Clone() fwk.StateData {
    return s
}

func (pl *MyPlugin) PreFilter(ctx context.Context, state fwk.CycleState, pod *v1.Pod, nodes []fwk.NodeInfo) (*fwk.PreFilterResult, *fwk.Status) {
    // Expensive computation
    data := expensiveComputation(pod)

    // Store in cycle state
    state.Write(”myPluginState”, &myState{computedData: data})
    return nil, nil
}

// PreFilterExtensions returns nil as we don’t need incremental updates
func (pl *MyPlugin) PreFilterExtensions() fwk.PreFilterExtensions {
    return nil
}

func (pl *MyPlugin) Filter(ctx context.Context, state fwk.CycleState, pod *v1.Pod, nodeInfo fwk.NodeInfo) *fwk.Status {
    // Retrieve pre-computed data
    c, err := state.Read(”myPluginState”)
    if err != nil {
        return fwk.AsStatus(err)
    }
    s := c.(*myState)

    // Use pre-computed data for fast filtering
    // ...
}
2. Use Framework Handle for Cluster State Access: the Handle provides access to snapshots, informers, and other scheduler services:
func (pl *MyPlugin) Filter(ctx context.Context, state fwk.CycleState, pod *v1.Pod, nodeInfo fwk.NodeInfo) *fwk.Status {
    // Access cluster snapshot
    snapshot := pl.handle.SnapshotSharedLister()
    allNodes, _ := snapshot.NodeInfos().List()

    // Access other resources through informers
    // pl.handle.SharedInformerFactory()...
}
3. Implement EnqueueExtensions for Performance: add queueing hints to avoid unnecessary reschedule attempts:
func (pl *MyPlugin) EventsToRegister(_ context.Context) ([]fwk.ClusterEventWithHint, error) {
    return []fwk.ClusterEventWithHint{
        {Event: fwk.ClusterEvent{Resource: fwk.Node, ActionType: fwk.Add}, QueueingHintFn: pl.isSchedulableAfterNodeAdd},
    }, nil
}
4. Plugin Initialization and State Management: if your plugin requires setup beyond the factory function, store the handle and perform initialization:
type MyPlugin struct {
    handle fwk.Handle
    client kubernetes.Interface
    // Plugin-specific state
    cache map[string]interface{}
    mu    sync.RWMutex
}

// New factory function
func New(_ context.Context, obj runtime.Object, h fwk.Handle) (fwk.Plugin, error) {
    pl := &MyPlugin{
        handle: h,
        client: h.ClientSet(),
        cache:  make(map[string]interface{}),
    }

    // Setup watchers, informers, or background tasks
    pl.setupInformers()

    return pl, nil
}

func (pl *MyPlugin) setupInformers() {
    // Access shared informers through the handle
    informerFactory := pl.handle.SharedInformerFactory()
    podInformer := informerFactory.Core().V1().Pods().Informer()

    // Add event handlers if needed
    podInformer.AddEventHandler(cache.ResourceEventHandlerFuncs{
        AddFunc: pl.onPodAdd,
        UpdateFunc: pl.onPodUpdate,
    })
}

func (pl *MyPlugin) onPodAdd(obj interface{}) {
    pod := obj.(*v1.Pod)
    // Update plugin state based on cluster events
    pl.mu.Lock()
    defer pl.mu.Unlock()
    pl.cache[string(pod.UID)] = pod.Status.Phase
}
5. Consider Performance: remember that Filter and Score plugins run for every node, so keep operations efficient:
Cache expensive computations in PreFilter/PreScore
Use efficient data structures
Avoid API calls in hot paths
Profile your code under load
Testing Custom Plugins
The scheduler-plugins framework provides a comprehensive testing infrastructure to validate custom plugin implementations. This includes utilities for unit testing, integration testing with the scheduler framework, and end-to-end testing in cluster environments.
Testing Framework Capabilities
The framework offers three levels of testing support:
Unit Testing
The framework provides interfaces and utilities to test individual plugin methods in isolation. Plugins can be tested independently using mock objects and fake implementations:
func TestPlacementPolicyFilter(t *testing.T) {
    // Initialize plugin with test configuration
    plugin := &PlacementPolicyPlugin{...}
    state := framework.NewCycleState()

    // Verify filtering behavior
    status := plugin.Filter(context.Background(), state, testPod, testNode)
    if !status.IsSuccess() {
        t.Errorf(”Expected Success, got %v”, status)
    }
}
2. Integration Testing
The framework enables integration testing by providing utilities to instantiate a scheduler with custom plugins and verify their interaction with the scheduling workflow:
func TestSchedulerWithPlacementPolicy(t *testing.T) {
    // Create fake Kubernetes clientset
    client := fake.NewSimpleClientset()

    // Initialize scheduler with custom plugin using framework utilities
    sched := setupSchedulerWithPlugin(t, client)

    // Verify scheduling behavior
    pod := createTestPod()
    result, err := sched.Schedule(context.Background(), pod)
    assert.NoError(t, err)
    assert.Equal(t, “expected-node”, result.SuggestedHost)
}
3. End-to-End Testing
The framework supports E2E testing against actual cluster environments, enabling validation of complete scheduling workflows, including plugin registration, configuration, and runtime behavior:
func TestPlacementPolicyE2E(t *testing.T) {
    // Setup test cluster infrastructure
    cluster := setupTestCluster(t)
    defer cluster.Cleanup()

    // Deploy custom scheduler with plugin
    deployScheduler(t, cluster)

    // Configure plugin-specific resources
    policy := &PlacementPolicy{
        Spec: PlacementPolicySpec{
            TargetSize: “40%”,
            NodeSelector: map[string]string{”node-type”: “ephemeral”},
        },
    }
    cluster.Create(policy)

    // Deploy test workload
    deployment := createTestDeployment(10)
    cluster.Create(deployment)

    // Validate scheduling outcomes
    waitForPodsRunning(t, cluster, deployment, 10)
    pods := getPods(cluster, deployment)
    ephemeralCount := countPodsOnNodes(pods, “node-type=ephemeral”)

    assert.Equal(t, 4, ephemeralCount, “Expected 40% placement on ephemeral nodes”)
}
Production-quality test implementations are available in the official repositories:
Example For Custom Plugin: Placement Policy Scheduler
A great production example of custom scheduler plugins is Placement Policy Scheduler, which addresses cost optimization with ephemeral nodes.
The plugin implements two custom plugins that enable policy-based placement:
Scorer Plugin (Best Effort Mode)
Extension points: PreScore, Score
Distributes pods across node groups based on target percentages
Uses weighted scoring to influence placement decisions
2. Filter Plugin (Strict Mode)
Extension points: PreFilter, Filter
Enforces hard constraints on pod placement
Rejects nodes that would violate the policy
Plugin Configuration
apiVersion: placement-policy.scheduling.x-k8s.io/v1alpha1
kind: PlacementPolicy
metadata:
  name: cost-optimization
spec:
  weight: 100
  enforcementMode: BestEffort  # or Strict
  podSelector:
    matchLabels:
      app: nginx
  nodeSelector:
    matchLabels:
      node-type: ephemeral  # Spot instances
  policy:
    action: Must  # or MustNot
    targetSize: 40%  # Place 40% of pods on ephemeral nodes
With this policy:
40% of nginx pods are scheduled on ephemeral nodes (cost savings)
60% remain on regular nodes (reliability)
Scheduler automatically maintains this ratio as pods scale
How It Works
PreFilter Phase:
// Calculate how many pods should be on targeted nodes
func (pl *PlacementPolicyPlugin) PreFilter(ctx context.Context, state framework.CycleState, pod *v1.Pod, nodes []framework.NodeInfo) (*framework.PreFilterResult, *framework.Status) {
    // Find matching policies for this pod
    policies := pl.findMatchingPolicies(pod)

    // Calculate current placement distribution
    current := pl.calculateCurrentDistribution(pod, policies)

    // Store in CycleState for Filter/Score to use
    state.Write(”placementPolicy”, &PolicyState{
        policies: policies,
        current:  current,
    })
    return nil, nil
}
Score Phase (Best Effort):
func (pl *PlacementPolicyPlugin) Score(ctx context.Context, state framework.CycleState, pod *v1.Pod, nodeInfo framework.NodeInfo) (int64, *framework.Status) {
    policyState := state.Read(”placementPolicy”).(*PolicyState)
    node := nodeInfo.Node()

    for _, policy := range policyState.policies {
        if policy.nodeSelector.Matches(node.Labels) {
            // Calculate if we need more pods on this node type
            currentPercentage := policyState.current[policy.Name]
            targetPercentage := policy.Spec.Policy.TargetSize

            if currentPercentage < targetPercentage {
                return 100, nil  // Boost score - we need more pods here
            }
            return 0, nil  // Lower score - we have enough
        }
    }
    return 50, nil  // Neutral score
}
Method 3: Using Multiple Scheduler Profiles
One of the most powerful features of the Kubernetes scheduler framework is the ability to run multiple scheduler profiles within a single scheduler binary. This enables sophisticated multi-tenancy, A/B testing, and workload-specific scheduling policies without deploying separate scheduler instances.
What Are Scheduler Profiles?
A scheduler profile is a named configuration that defines:
Which plugins are enabled at each extension point
Plugin-specific configuration (weights, parameters, etc.)
Performance settings (percentage of nodes to score)
One scheduler binary can run multiple profiles simultaneously. Each profile gets its own framework instance with its own plugin configuration, but they all share the same:
Scheduling queue
Cluster cache/snapshot
Client connections
Informers
How Pod-to-Profile Matching Works
Pods are matched to profiles via the `spec.schedulerName` field:
apiVersion: v1
kind: Pod
metadata:
  name: my-pod
spec:
  schedulerName: high-priority-scheduler  # Matches this profile
  containers:
  - name: app
    image: nginx
From the actual scheduler code (`pkg/scheduler/schedule_one.go`):
func (sched *Scheduler) ScheduleOne(ctx context.Context) {
    // Get next pod from queue
    podInfo, err := sched.NextPod(logger)
    pod := podInfo.Pod

    // Match pod to the correct framework based on schedulerName
    fwk, err := sched.frameworkForPod(pod)
    if err != nil {
        // Pod specifies unknown scheduler name
        logger.Error(err, “Error occurred”)
        return
    }

    // Schedule using the matched profile’s framework
    scheduleResult, err := sched.SchedulePod(ctx, fwk, state, pod)
    // ...
}
The scheduler maintains a map of profiles:
// From pkg/scheduler/scheduler.go
type Scheduler struct {
    // Profiles are the scheduling profiles
    Profiles profile.Map  // map[schedulerName]Framework

    SchedulingQueue internalqueue.SchedulingQueue
    Cache           internalcache.Cache
    // ...
}
Multi-Profile Configuration Example
Here’s a practical example with three profiles for different workload types:
apiVersion: kubescheduler.config.k8s.io/v1
kind: KubeSchedulerConfiguration
profiles:
  # Profile 1: Default general-purpose scheduling
  - schedulerName: default-scheduler
    plugins:
      score:
        enabled:
          - name: NodeResourcesFit
            weight: 1
          - name: PodTopologySpread
            weight: 2
    pluginConfig:
      - name: NodeResourcesFit
        args:
          scoringStrategy:
            type: LeastAllocated
            resources:
              - name: cpu
                weight: 1
              - name: memory
                weight: 1

  # Profile 2: Batch workloads - bin packing for efficiency
  - schedulerName: batch-scheduler
    plugins:
      score:
        enabled:
          - name: NodeResourcesFit
            weight: 10  # High weight on resource fit
          - name: ImageLocality
            weight: 5   # Prefer nodes with cached images
        disabled:
          - name: PodTopologySpread  # Don’t spread batch jobs
    pluginConfig:
      - name: NodeResourcesFit
        args:
          scoringStrategy:
            type: MostAllocated  # Bin packing strategy
            resources:
              - name: cpu
                weight: 1
              - name: memory
                weight: 1
    percentageOfNodesToScore: 30  # Faster scheduling for batch

  # Profile 3: Latency-sensitive workloads - spread for HA
  - schedulerName: latency-scheduler
    plugins:
      score:
        enabled:
          - name: PodTopologySpread
            weight: 10  # Maximize spread
          - name: NodeResourcesFit
            weight: 1
    pluginConfig:
      - name: PodTopologySpread
        args:
          defaultConstraints:
            - maxSkew: 1
              topologyKey: topology.kubernetes.io/zone
              whenUnsatisfiable: ScheduleAnyway
            - maxSkew: 1
              topologyKey: kubernetes.io/hostname
              whenUnsatisfiable: ScheduleAnyway
    percentageOfNodesToScore: 100  # Evaluate all nodes for best spread
Using the Profiles
Deploy workloads with different profiles:
# Batch job - uses bin packing
apiVersion: batch/v1
kind: Job
metadata:
  name: data-processing
spec:
  template:
    spec:
      schedulerName: batch-scheduler
      containers:
      - name: processor
        image: data-processor:latest
        resources:
          requests:
            cpu: 4
            memory: 8Gi

---
# Latency-sensitive service - uses spreading
apiVersion: apps/v1
kind: Deployment
metadata:
  name: frontend
spec:
  replicas: 10
  template:
    spec:
      schedulerName: latency-scheduler
      containers:
      - name: frontend
        image: frontend:latest

---
# Regular workload - uses default scheduler
apiVersion: apps/v1
kind: Deployment
metadata:
  name: backend
spec:
  replicas: 3
  template:
    spec:
      # schedulerName omitted = uses “default-scheduler”
      containers:
      - name: backend
        image: backend:latest
When to Use Multiple Profiles
Use multiple profiles when you need:
Multi-Tenancy: different scheduling policies for different teams/namespaces, for example:
Team A: ML workloads (GPU affinity, bin packing)
Team B: Web services (spread, network-aware)
Team C: Cost-optimized (spot instances, preemptible nodes)
2. Workload-Specific Optimization
Batch jobs: Bin packing for efficiency
Latency-sensitive: Spread across zones for HA
GPU workloads: GPU topology awareness
Storage-heavy: Volume locality optimization
3. A/B Testing & Gradual Rollouts: deploy 10% of pods with schedulerName: production-scheduler-v2 to test new scheduling logic.
profiles:
  - schedulerName: production-scheduler-v1
    # Current production config
  - schedulerName: production-scheduler-v2
    # New experimental config
4. Compliance & SLA Requirements
Critical workloads: Profile that never schedules on spot instances
Dev workloads: Profile that prefers spot instances
PCI-compliant workloads: Profile that only schedules on certified nodes
Don’t use multiple profiles when:
Simple configuration changes suffice (just adjust plugin weights)
You need completely independent schedulers (deploy separate scheduler binaries instead)
Memory is constrained (each profile duplicates plugin instances)
Multiple Profiles Performance Considerations
Plugin Instantiation: Each profile creates its own plugin instances (memory overhead)
Shared Cache: Only one cache/snapshot regardless of profile count (efficient)
Queue: Single shared queue across all profiles (efficient)
Scheduling: Each pod only goes through one profile’s framework (no duplication)
Validation & Constraints
The scheduler enforces several constraints:
Unique Scheduler Names: Each profile must have a unique `schedulerName`
Same QueueSort: All profiles must use the same QueueSort plugin (single queue limitation)
At Least One Profile: Configuration must include at least one profile
One Bind Plugin: Each profile must have at least one Bind plugin
func ValidateKubeSchedulerConfiguration(cc *config.KubeSchedulerConfiguration) {
    // Validate unique scheduler names
    existingProfiles := make(map[string]int)
    for i, profile := range cc.Profiles {
        if idx, ok := existingProfiles[profile.SchedulerName]; ok {
            return fmt.Errorf(”duplicate schedulerName: %s”, profile.SchedulerName)
        }
        existingProfiles[profile.SchedulerName] = i
    }

    // Validate common QueueSort
    validateCommonQueueSort(cc.Profiles)
}
Monitoring Multiple Profiles
Each profile reports metrics with the profile label:
scheduler_plugin_execution_duration_seconds{
    profile=”batch-scheduler”,
    plugin=”NodeResourcesFit”,
    extension_point=”Score”
} 0.002

scheduler_plugin_execution_duration_seconds{
    profile=”latency-scheduler”,
    plugin=”PodTopologySpread”,
    extension_point=”Score”
} 0.005
This allows you to track per-profile performance and identify bottlenecks.
The beauty of the scheduler framework is that these methods can be combined. You can run multiple profiles (Method 3), each with custom plugin configurations (Method 1), and even include custom out-of-tree plugins (Method 2) in those profiles.
In the next post, I’ll provide a comprehensive reference guide to all 19 in-tree scheduler plugins, including detailed explanations of how each one works and when to use them.
Resources
Repository for out-of-tree scheduler plugins based on scheduler framework. - kubernetes-sigs/scheduler-pluginsgithub.com
Production-Grade Container Scheduling and Management - kubernetes/pkg/scheduler at master · kubernetes/kubernetesgithub.com
FEATURE STATE: Kubernetes v1.19 [stable] The scheduling framework is a pluggable architecture for the Kubernetes…kubernetes.io